Google Maps API – adding multiple locations on the map using custom posts
In this article we will show you how to use Google Maps API to display a list of custom posts as pins on the map. Our task will be to create a list of places that will be saved as custom post type as a journey. Each trip will have a specific one:
- journey point (colloquial name),
- state,
- date,
- description of the journey,
- image (will be displayed on the map as a point).
In addition, we would like to line up the locations we visited and colour the space between them. When you click on a particular location, we will display information about it.
Below the map, we will place a list of the trips, together with the places we have visited. After clicking on a given place on the list – information about the given point will be displayed on the map.
Create API_KEY to Google Maps API
Google Maps API is a very powerful application from Google that allows us to display different information on maps in very different ways. The application is located on Google Cloud Platform together with other Google applications. Unfortunately, for some time the application has become payable.
Currently, to use the Google Maps API, you need to create an account on Google Cloud Platform. After creating an account we receive 300USD to use on Google services. It is enough for our applications to create such a map. However, if you would like to create such a map on your website that generates a lot of views – the free limit will be used quickly.
How to generate key to Google Maps API
After logging into your Google Cloud Platform account we create a project of any name. We will name our project – Travels API. After creating the project, we enter the navigation menu and select APIs and services > Library..
In the library, we select the necessary applications:
- Maps Javascript API
- Places API.

We activate both applications and proceed to create the key.
Again we return to the main panel Application and service interfaces and go to Login data. Click Create Login Details and select Application interface key.

It will redirect us to OAuth acceptance screen. We give a name to the application and select Type of users > External.

Done! We have our key, which we copy right away.

Create custom post type to be displayed on the map
Our Custom Post Type will have a service called ‘underside‘. Our journey will have several places on the map, so we need to use ACF Repeater Field. This is a field type that allows you to repeat posture values as many times as you need. It is an addition to a familiar plugin that allows you to add Custom Fields to posts of this type. If you don’t know how Custom Fields work, read our article: Advanced Custom Fields – custom field types WordPress.
How to add a recurring field in ACF ?
After adding our custom post type ‘subchapter’, we add a repeating field. We create a new group of fields that correspond to the type of ‘sub’ entry. Add the appropriate label and select the field type: Repetitive field. Then we add all the fields we wrote about at the beginning of the article.
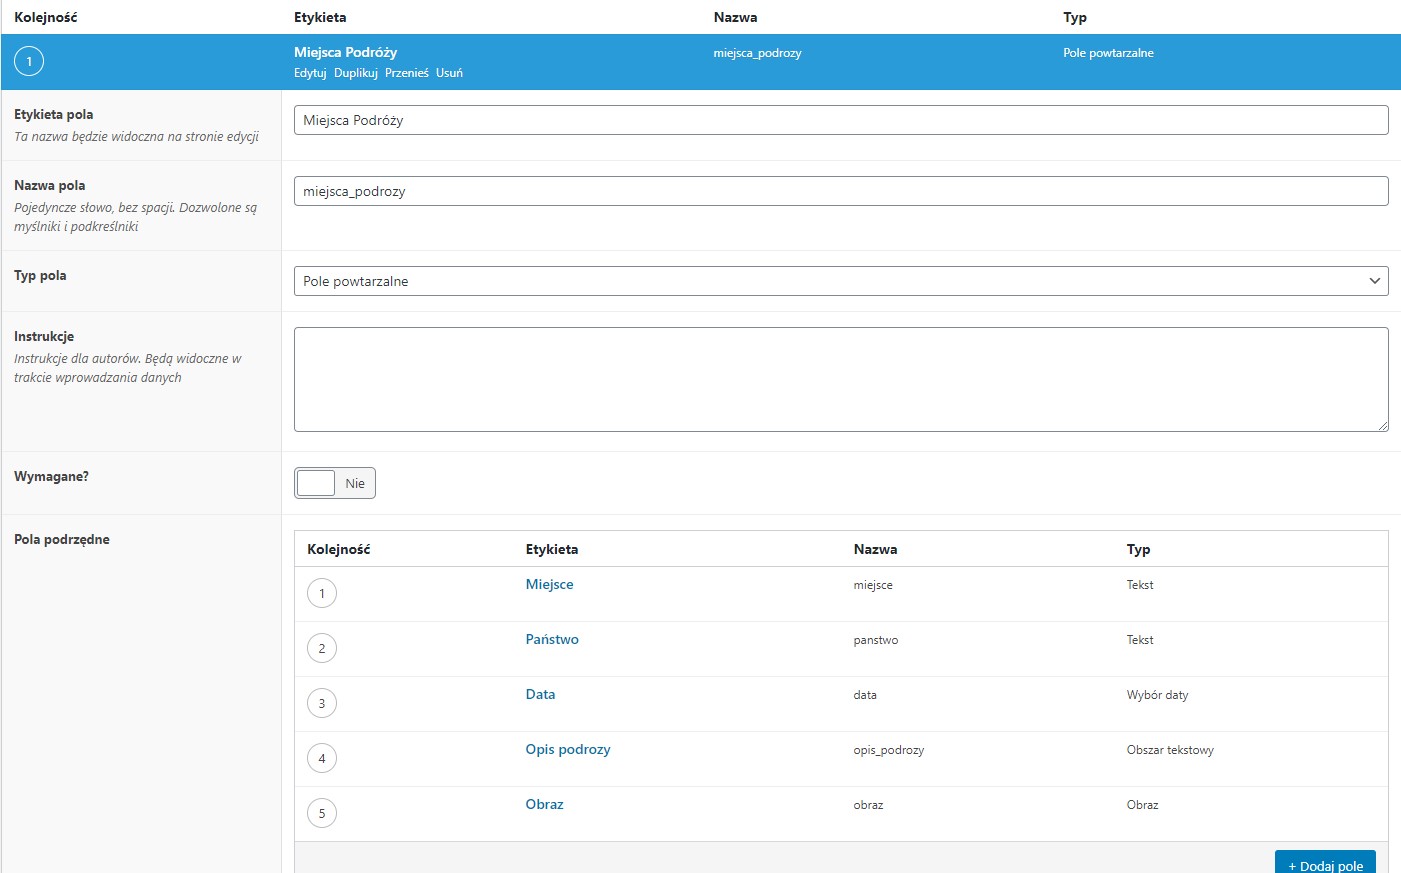
Ready! We have created a custom post type Journey, which has all the fields needed to be displayed on the map. Now you need to add some sample trips and visited places.
We are creating a widget adding a map and a list of our trips
We will create a podroze.php widget, which will add a map and a list of our travels below. For this purpose we will use WPBakery builder’s page. Of course we can also use Elementor, if you don’t know how to add widgets in these plugins – I refer to articles as standard:
Creating your own plugin that adds a widget to the Elementor plugin
Creating your own plugin that adds a widget to the WPBakery plugin
Inside the widget, we place the basic configuration and load a list of the travels and places we visited during the journey.
1 2 3 4 5 6 7 8 9 10 11 12 13 14 15 16 17 18 19 20 21 22 23 24 25 26 27 28 29 30 31 32 33 34 35 36 37 38 39 40 41 42 43 44 45 46 47 48 49 50 51 | <?php if ( ! defined( 'ABSPATH' ) ) { die( '-1' ); } class WPBakeryShortCode_podroze extends WPBakeryShortCode { protected function content( $atts, $content = null ) { extract( shortcode_atts( array( '' => '' ), $atts ) ); $podroze = get_posts(array( "post_type" => 'podroz', 'numberposts' => -1, 'order' => 'ASC' )); ob_start(); ?> <!-- HTML DESIGN HERE --> <div class="podroze-container"> <div id="map-container"> </div> <div class="podroze-lista-container"> <ol> <?php foreach($podroze as $p) : ?> <li><?php echo $p->post_title; ?> <?php if( have_rows('miejsca_podrozy',$p->ID) ): ?><ul><?php while ( have_rows('miejsca_podrozy',$p->ID) ) : the_row(); $miejsce = get_sub_field('miejsce'); ?><li><?php echo $miejsce;?></li><?php endwhile; ?></ul><?php else : endif; ?> </li> <?php endforeach ?> </ol> </div> </div> <!-- HTML END DESIGN HERE --> <?php return ob_get_clean(); } } vc_map( array( "name" => __( 'Podroze', 'redo_podroze' ), "base" => "podroze", "category" => __('REDO Addons'), "description" => __('Display team slider', ''), "icon" => plugin_dir_url( __FILE__ ).'../icons/int-banner.png', 'params' => array( ), ) ); |
We create a map with locations using AJAX
Once we have the structure to which we load the map and the list of our journeys, then we move on to creating the map. To do this we go to functions.php, where we have to add our redo-script.js script and register the Google Maps API script.
If you don’t know how to work with AJAX in WordPress I invite you to read this article: How to create a custom post filter using AJAX in WordPress?
1 2 3 4 5 6 7 8 9 10 11 12 13 14 | function add_js_scripts_redo() { wp_enqueue_script( 'redoscript', get_template_directory_uri().'/js/redo-script.js', array('jquery'), 1.4, true ); wp_enqueue_script( 'googlemaps', 'https://maps.googleapis.com/maps/api/js?key=YOURS_API_KEY' , array() , 1,1,1 ); if ( isset($_SERVER['HTTPS']) ) $protocol = 'https://'; else $protocol = 'http://'; wp_localize_script('redoscript', 'ajaxurl' , admin_url( 'admin-ajax.php', $protocol ) ); } add_action('wp_enqueue_scripts', 'add_js_scripts_redo'); add_action( 'wp_ajax_get_travels', 'get_travels' ); add_action( 'wp_ajax_nopriv_get_travels', 'get_travels' ); function get_travels() { } |
In get_travels() we add to our JSON $contents. After the initial configuration and displaying the map with places, we will move on to a more advanced configuration of our map (place, date, description, image).
1 2 3 4 5 6 7 8 9 10 11 12 13 14 15 16 17 18 19 20 21 | function get_travels() { $travelsQuery = new WP_Query(array( 'post_type' => 'podroz', 'posts_per_page' => -1, 'order' => 'ASC' )); $travels=($travelsQuery->posts); $travelsString = []; $contents = []; foreach($travels as $t) { if( have_rows('miejsca_podrozy',$t->ID) ): while ( have_rows('miejsca_podrozy',$t->ID) ) : the_row(); $miejsce = get_sub_field('miejsce'); $travelsString[$miejsce] = $miejsce; endwhile; endif; } $contents = json_encode([ $travelsString]); echo $contents; die(); } |
AJAX script loading Google Maps API with custom posts
In functions.php we have created a get_travels() which will return a list of Places to be displayed on the map. To handle it we must first configure the map to display it. So we will create initializeMap() and codeAdress().
Google Maps – map initialization
In initializeMap() we will load the ID of our container onto the map and add to it a map with basic configuration and places which we will later load using AJAX. Additionally, when initializing the map we will use codeAdress(), which will make us see information about the place after clicking on it.
1 2 3 4 5 6 7 8 9 10 11 12 13 14 15 16 17 18 19 20 21 22 23 24 25 26 27 28 29 30 31 32 33 34 | function initializeMap(mapID, addresses) { geocoder = new google.maps.Geocoder(); var latlng = new google.maps.LatLng(50.8227222, 4.3486888); var mapOptions = { zoom: 4, center: latlng } map = new google.maps.Map(document.getElementById(mapID), mapOptions); var infowindow = new google.maps.InfoWindow({}); for (var k in addresses) { if (addresses.hasOwnProperty(k)) { codeAddress(map, geocoder, k, addresses[k], infowindow); } } } function codeAddress(map, geocoder, name, address, infowindow) { console.log(address); geocoder.geocode({'address': address}, function (results, status) { if (status == 'OK') { var marker = new google.maps.Marker({ map: map, position: results[0].geometry.location, title: name }); google.maps.event.addListener(marker, 'click', (function (marker) { return function () { infowindow.setContent('<h3>' + name + '</h3>' + '<div class="infoAddress">' + address + '</div>'); infowindow.open(map, marker); } })(marker)); } else { } }); } |
Following data to Google Maps using AJAX
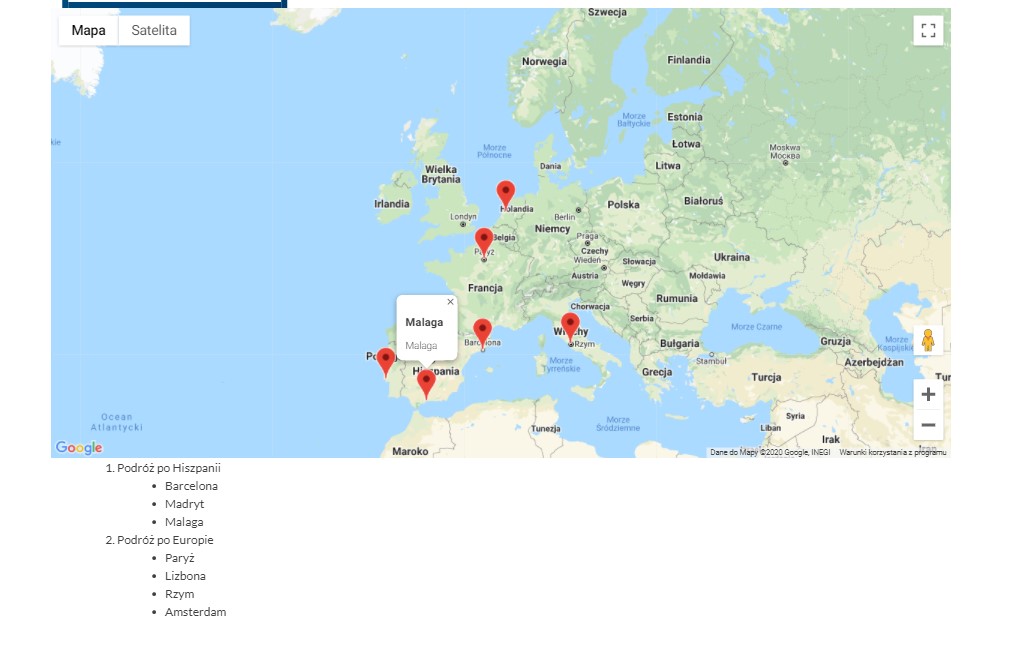
Now load our destinations and display them on the map we will display in our container with id #map-container using initializeMap().
1 2 3 4 5 6 7 8 9 10 11 12 13 14 15 16 17 | (function($){ $(document).ready(function() { $.post( ajaxurl, { 'action' : 'get_travels', }, function( response ) { $data=$.parseJSON(response); var miejsca = []; miejsca = $data[0]; initializeMap("map-container", miejsca); } ); }); })(jQuery); |
We received a view of our map with a list of journeys and places.
Configuration of Google Maps API in WordPress
We already have the basic configuration of our map, which displays the places of travel. We would like to configure the display of our map as discussed at the beginning. Instead of pins on the map, we will display the image assigned to the place. In the place descriptions, you will find the name of the place, country, description and date. Additionally, each journey is to be connected by lines and the area forming a polygon is to be painted.
Google Maps API – loading own data
The first step is to load and display the data we would like to add to the map. To do this we have to load the rest of the data in functions.php. Apart from the name of the place we have to download also:
- trip list,
- name of country,
- description,
- date,
- image.
We encode json_encode() and send in the $contents.
1 2 3 4 5 6 7 8 9 10 11 12 13 14 15 16 17 18 19 20 21 22 23 24 25 26 27 28 29 30 31 32 33 34 35 | function get_travels() { $travelsQuery = new WP_Query(array( 'post_type' => 'podroz', 'posts_per_page' => -1, 'order' => 'ASC' )); $travels=($travelsQuery->posts); $travelsString = []; $namesString = []; $capitalsString = []; $descriptionsString = []; $dateString = []; $imagesString = []; $contents = []; foreach($travels as $t) { if( have_rows('miejsca_podrozy',$t->ID) ): $travelsString[$t->post_name] = $t->post_name; while ( have_rows('miejsca_podrozy',$t->ID) ) : the_row(); $miejsce = get_sub_field('miejsce'); $obraz = get_sub_field('obraz'); $data = get_sub_field('data'); $opis = get_sub_field('opis_podrozy'); $panstwo = get_sub_field('panstwo'); $namesString[$t->post_name][$miejsce] = $miejsce; $imagesString[$t->post_name][$miejsce] = $obraz; $dateString[$t->post_name][$miejsce] = $data; $capitalsString[$t->post_name][$miejsce] = $panstwo; $descriptionsString[$t->post_name][$miejsce] = $opis; endwhile; endif; } $contents = json_encode([$travelsString,$namesString,$imagesString,$capitalsString,$dateString,$descriptionsString] ); echo $contents; die(); } |
We go to our JS script – redo-script.js. We need to properly organize the JSON we received from the server and take the necessary data out of it.
1 2 3 4 5 6 7 8 9 10 11 12 13 14 15 16 17 18 19 20 21 22 | (function($){ $(document).ready(function() { $.post( ajaxurl, { 'action' : 'get_travels', }, function( response ) { $data=$.parseJSON(response); var podroze = $data[0]; var miejsca = $data[1]; var obrazy = $data[2]; var panstwa = $data[3]; var daty = $data[4]; var opisy = $data[5]; initializeMap("map-container", podroze, miejsca, obrazy, panstwa, daty, opisy); } ); }); })(jQuery); |
We already have all the data and can pass it on to the initializeMap(), which initiates our map. We retrieve data in the constructor of our function:
1 | function initializeMap(mapID, travels, addresses, images, capitals, dates, descriptions) {} |
Now we need to rebuild our loop for it to read the travel lists and the data contained in them.
1 2 3 4 5 6 7 | for (var i in travels) { for (var k in addresses[i]) { if (addresses[i].hasOwnProperty(k)) { codeAddress(map, geocoder, k, addresses[i][k], images[i][k], capitals[i][k], dates[i][k], descriptions[i][k], infowindow); } } } |
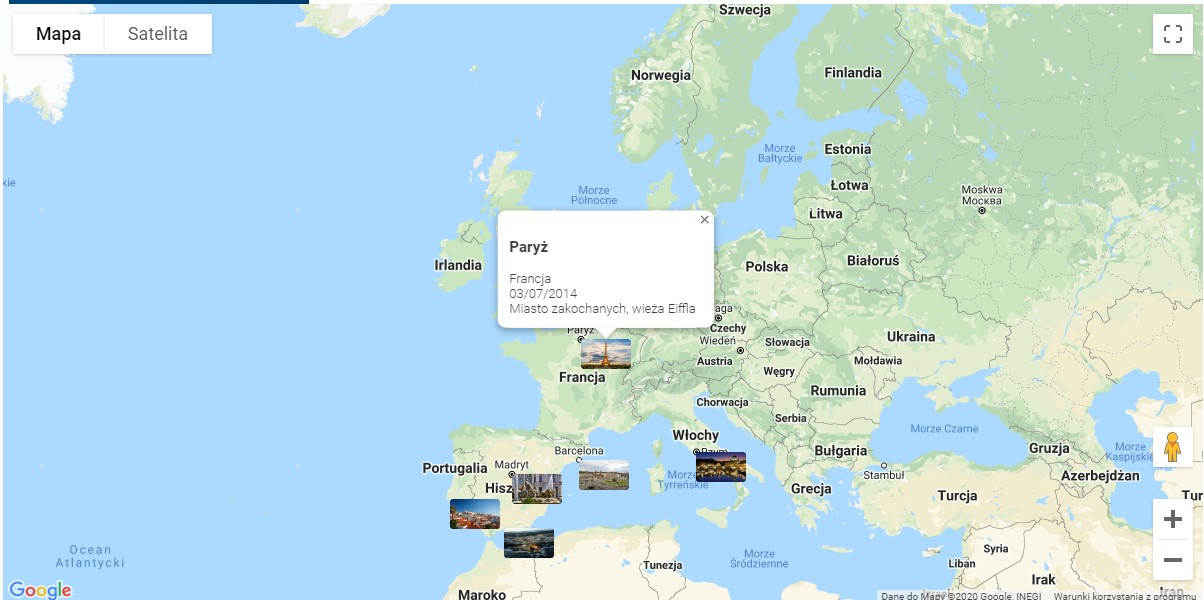
Now in codeAddress() we can pass all the location data and set the image of our pin. We set the image using the builder icon value google.maps.Marker(). We also set the image size to 50px width and 30px height. We will pass the rest of the data to the infowindow value, which will show us the rest of the information about the destination on the screen.
1 2 3 4 5 6 7 8 9 10 11 12 13 14 15 16 17 18 19 20 21 22 23 24 25 26 27 | function codeAddress(map, geocoder, name, address, image, capital, date, description, infowindow) { geocoder.geocode({'address': address}, function (results, status) { if (status == 'OK') { var pos = results[0].geometry.location; var icon = { url: image, // url scaledSize: new google.maps.Size(50, 30), // scaled size origin: new google.maps.Point(0,0), // origin anchor: new google.maps.Point(0, 0) // anchor }; var marker = new google.maps.Marker({ map: map, position: pos, title: name, icon: icon }); google.maps.event.addListener(marker, 'click', (function (marker) { return function () { infowindow.setContent('<h3>' + name + '</h3>' + '<div class="infoAddress"><div class="panstwo">'+capital+'</div><div class="data">'+ date +'</div><div class="opis">'+ description +'</div>'); infowindow.open(map, marker); } })(marker)); } else { } }); } |
In this way we got a view with pictures instead of pins and information about a given destination.
Polygons and polylines in Google Maps API – how to select an area on the map
We move on to another requirement of our project. We would like the list under the map to become interactive – after clicking on a given place of travel, an information window on the map about that place will open. Besides, we want to mark the areas of our journeys on the map, connecting all the places of a given journey with each other and creating a polygon, which we will paint in the appropriate colour.
Interactive Google Maps API list.
In our redo-script.js script, we place an empty array called gmarkers[]. This board will store all locations of our map. It will be called when you click on an item in our list (place of travel).
The gmarkers[] will be passed in codeAddress() and add the value of the marker to it using push().
We modify our redo-script.js code accordingly:
1 2 3 4 5 6 7 8 9 10 11 12 13 14 15 | var gmarkers = []; //Dodajemy na początku pliku if (addresses[i].hasOwnProperty(k)) { //modyfikujemy wywołanie funkcji codeAddress o nową tablicę - gmarkers[] codeAddress(map, geocoder, k, addresses[i][k], images[i][k], capitals[i][k], dates[i][k], descriptions[i][k], infowindow, gmarkers); } function codeAddress(map, geocoder, name, address, image, capital, date, description, infowindow, markers) { //odbieramy tablicę gmarkers w zmiennej markers var marker = new google.maps.Marker({ map: map, position: pos, title: name, icon: icon }); markers.push(marker); // po dodaniu markera dodajemy go do naszej tablicy } |
Now we go to our podroze.php file in REDO JSComposer Additional plugin.
Add a $i=0 of our loop while(), which will count how many destinations there are and for each destination add a link to the assigned marker.
The whole code podroze.php:
1 2 3 4 5 6 7 8 9 10 11 12 13 14 15 16 17 18 19 20 21 22 23 24 25 26 27 28 29 30 31 32 33 34 35 36 37 38 39 40 41 42 43 44 45 46 47 48 49 50 51 52 53 | <?php if ( ! defined( 'ABSPATH' ) ) { die( '-1' ); } class WPBakeryShortCode_podroze extends WPBakeryShortCode { protected function content( $atts, $content = null ) { extract( shortcode_atts( array( '' => '' ), $atts ) ); $podroze = get_posts(array( "post_type" => 'podroz', 'numberposts' => -1, 'order' => 'ASC' )); $i = 0; ob_start(); ?> <!-- HTML DESIGN HERE --> <div class="podroze-container"> <div id="map-container"> </div> <div class="podroze-lista-container"> <ol> <?php foreach($podroze as $p) : ?> <li><?php echo $p->post_title; ?> <?php if( have_rows('miejsca_podrozy',$p->ID) ): ?><ul><?php while ( have_rows('miejsca_podrozy',$p->ID) ) : the_row(); $miejsce = get_sub_field('miejsce'); ?><li><a href='javascript:google.maps.event.trigger(gmarkers[<?php echo $i ?>],"click");'><?php echo $miejsce; $i++; ?></a></li><?php endwhile; ?></ul><?php else : endif; ?> </li> <?php endforeach ?> </ol> </div> </div> <!-- HTML END DESIGN HERE --> <?php return ob_get_clean(); } } vc_map( array( "name" => __( 'Podroze', 'redo_podroze' ), "base" => "podroze", "category" => __('REDO Addons'), "description" => __('Display team slider', ''), "icon" => plugin_dir_url( __FILE__ ).'../icons/int-banner.png', 'params' => array( ), ) ); |
Create your own area on a Google map
Now with google.maps.Polygon we create areas of our travels. We put in the first loop for(var i in travels) – responsible for displaying our travel lists – empty board poly =[], which will store the coordinates of our travel destinations. Then add the value poly. This value will store the created Polygon (area on the map corresponding to the area of our journey). We set the area colour and other values.
1 2 3 4 5 6 7 8 9 10 | for (var i in travels) { var poly = []; var polilinia = new google.maps.Polygon({ strokeColor: '#FF0000', strokeWeight: 0.8, strokeOpacity: 2, fillColor: '#FF0000', fillOpacity: 0.35 }); ... |
Przekazujemy tablicę poly[] i zmienną polilinia do funkcji codeAddress().
1 | codeAddress(mapa, geokoder, k, adresy[i][k], obrazki[i][k], wielkie litery[i][k], daty[i][k], opisy[i][k], infowindow, poly, polilinia, gmarkers); |
W codeAddress() ustalamy latitude oraz longitude miejsca podróży. Następnie w odpowiedniej strukturze dodajemy do zmiennej polyline, która jest przechowywana w zmiennej shape, która jest przechowywana w zmiennej push(), za pomocą funkcji setPath().
1 2 3 4 5 6 7 8 9 10 | function codeAddress(map, geocoder, name, address, image, capital, date, description, infowindow, shape, polyline, markers) { console.log(address); geocoder.geocode({'address': address}, function (results, status) { if (status == 'OK') { var pos = results[0].geometry.location; var latitude = pos.lat(); var longitude = pos.lng(); shape.push({lat: latitude, lng: longitude}); polyline.setPath(shape); ... |
Back to our initializeMap() and at the end of our loop for(var and in travels) we add the final path returned by codeAddress() to polyline. Then add our area to the map using setMap().
1 2 | polilinia.setPath(poly); polilinia.setMap(map); |
That is the whole code of our map.
redo-script.js:
1 2 3 4 5 6 7 8 9 10 11 12 13 14 15 16 17 18 19 20 21 22 23 24 25 26 27 28 29 30 31 32 33 34 35 36 37 38 39 40 41 42 43 44 45 46 47 48 49 50 51 52 53 54 55 56 57 58 59 60 61 62 63 64 65 66 67 68 69 70 71 72 73 74 75 76 77 78 79 80 81 82 83 84 | var gmarkers = []; function initializeMap(mapID, travels, addresses, images, capitals, dates, descriptions) { geocoder = new google.maps.Geocoder(); var latlng = new google.maps.LatLng(50.8227222, 4.3486888); var mapOptions = { zoom: 4, center: latlng } map = new google.maps.Map(document.getElementById(mapID), mapOptions); var infowindow = new google.maps.InfoWindow({}); for (var i in travels) { var poly = []; var polilinia = new google.maps.Polygon({ strokeColor: '#FF0000', strokeWeight: 0.8, strokeOpacity: 2, fillColor: '#FF0000', fillOpacity: 0.35 }); for (var k in addresses[i]) { if (addresses[i].hasOwnProperty(k)) { codeAddress(map, geocoder, k, addresses[i][k], images[i][k], capitals[i][k], dates[i][k], descriptions[i][k], infowindow, poly, polilinia, gmarkers); } } polilinia.setPath(poly); polilinia.setMap(map); } } function codeAddress(map, geocoder, name, address, image, capital, date, description, infowindow, shape, polyline, markers) { geocoder.geocode({'address': address}, function (results, status) { if (status == 'OK') { var pos = results[0].geometry.location; var latitude = pos.lat(); var longitude = pos.lng(); shape.push({lat: latitude, lng: longitude}); polyline.setPath(shape); var icon = { url: image, // url scaledSize: new google.maps.Size(50, 30), // scaled size origin: new google.maps.Point(0,0), // origin anchor: new google.maps.Point(0, 0) // anchor }; var marker = new google.maps.Marker({ map: map, position: pos, title: name, icon: icon }); markers.push(marker); google.maps.event.addListener(marker, 'click', (function (marker) { return function () { infowindow.setContent('<h3>' + name + '</h3>' + '<div class="infoAddress"><div class="panstwo">'+capital+'</div><div class="data">'+ date +'</div><div class="opis">'+ description +'</div>'); infowindow.open(map, marker); } })(marker)); } else { } }); } (function($){ $(document).ready(function() { $.post( ajaxurl, { 'action' : 'get_travels', }, function( response ) { $data=$.parseJSON(response); var podroze = $data[0]; var miejsca = $data[1]; var obrazy = $data[2]; var panstwa = $data[3]; var daty = $data[4]; var opisy = $data[5]; initializeMap("map-container", podroze, miejsca, obrazy, panstwa, daty, opisy); } ); }); })(jQuery); |
functions.php:
1 2 3 4 5 6 7 8 9 10 11 12 13 14 15 16 17 18 19 20 21 22 23 24 25 26 27 28 29 30 31 32 33 34 35 36 37 38 39 40 41 42 43 44 45 46 47 48 49 50 | function add_js_scripts_redo() { wp_enqueue_script( 'redoscript', get_template_directory_uri().'/js/redo-script.js', array('jquery'), 1,1,1 ) ); wp_enqueue_script( 'googlemaps', 'https://maps.googleapis.com/maps/api/js?key=Your_KEY_API' , array() , 1,1,1 ); if ( isset($_SERVER['HTTPS']) ) $protocol = 'https://'; else $protocol = 'http://'; // pass Ajax Url to script.js wp_localize_script('redoscript', 'ajaxurl' , admin_url( 'admin-ajax.php', $protocol ) ); } add_action('wp_enqueue_scripts', 'add_js_scripts_redo'); add_action( 'wp_ajax_get_travels', 'get_travels' ); add_action( 'wp_ajax_nopriv_get_travels', 'get_travels' ); function get_travels() { $travelsQuery = new WP_Query(array( 'post_type' => 'podroz', 'posts_per_page' => -1, 'order' => 'ASC' )); $travels=($travelsQuery->posts); $travelsString = []; $namesString = []; $capitalsString = []; $descriptionsString = []; $dateString = []; $imagesString = []; $contents = []; foreach($travels as $t) { if( have_rows('miejsca_podrozy',$t->ID) ): $travelsString[$t->post_name] = $t->post_name; while ( have_rows('miejsca_podrozy',$t->ID) ) : the_row(); $miejsce = get_sub_field('miejsce'); $obraz = get_sub_field('obraz'); $data = get_sub_field('data'); $opis = get_sub_field('opis_podrozy'); $panstwo = get_sub_field('panstwo'); $namesString[$t->post_name][$miejsce] = $miejsce; $imagesString[$t->post_name][$miejsce] = $obraz; $dateString[$t->post_name][$miejsce] = $data; $capitalsString[$t->post_name][$miejsce] = $panstwo; $descriptionsString[$t->post_name][$miejsce] = $opis; endwhile; endif; } $contents = json_encode([$travelsString,$namesString,$imagesString,$capitalsString,$dateString,$descriptionsString] ); echo $contents; die(); } |
The received map view:

Summary
Google Maps API is a powerful tool that can be modified in many ways. The documentation of the application is really excellent and we will find there all the knowledge we need to achieve the goals of our application. We managed to accomplish the task set at the beginning of the article and integrate Google Maps API with CMS WordPress functionality. I hope that the article will help someone understand or solve problems encountered while creating such a map.
I invite you to read other articles: Useful articles.