Creating your own plugin that adds a widget to the WPBakery plugin
In this tutorial you will learn how to create a plugin that allows you to add a widget anywhere on the site using the WPBakery page builder. This is a very useful functionality that this page builder does not have. It allows you to insert any code via Page Builder, allowing you to expand our site in any way you need. An example of using it can be adding a widget displaying Custom Post Type entries e.g. Projects in a certain way, such as grid.
How do you create your own plugin that works with WP Baker to create widgets?
What do we need?
- Active version of the WPBakery Page Builder – WordPress Page Builder Plugin – this is a paid plugin, allowing you to create views of pages using drag & drop. It is a tool to facilitate the creation of websites in WordPress, which greatly speeds up work on projects.
- Awareness of PHP and code creation in an object-oriented approach – our plugin will be created in an object-oriented approach using PHP and without knowledge in these subjects it will be difficult to understand the code created in this tutorial. I recommend reading the following tutorials: Object-oriented PHP for beginners and First steps in creating WordPress plugins
- Patience and focus while creating the plugin 🙂
Let’s start!
The first step will be to create a folder of our plugin, which we will call: REDO JSComposer Additional. The plugin should be placed in the folder where all our plugins are located, i.e. you should find the folder: Plugins, and in it create our folder where the plugin will be located. The folder name cannot contain upper and lower case letters, spaces and special characters, so we call the folder redo-jscomposer-additional respectively.
Now we have to create the structure of our plugin, which will look like this:

In our main folder of the plugin, we create folders:
- images – the folder where we will store our icons used in the plugin,
- widgets – a folder containing widgets to be displayed using the plugin,
and the files:
- index.php – file defining the plugin (plugin name, author, etc.) and initiating our main file main.php,
- main.php – main file of our plugin.
First let’s go to index.php edition.
The first step is to protect the code from direct access to files with ABSPATH, which is a constant defined in WordPress, securing access to .php files.
Then we put a description of our plugin in the comment block:
- Plugin Name – here you should give the name of our plugin, which will later be visible in plugins in the WordPress panel,
- Description – description of our plugin,
- Author– author’s name,
- Author URI– URL redirecting to author’s site,
- Version– plugin version,
- License– specify a license to make the plugin available to all users in WordPress plugins.
All fields are optional, except Plugin Name, which is a mandatory field.
Then using require_once() we add the path to the main plugin file.
1 2 3 4 5 6 7 8 9 10 11 12 13 14 15 16 | <?php if ( ! defined( 'ABSPATH' ) ) { die( '-1' ); } /* Plugin Name: REDO JSComposer Addditional Description: REDO JSComposer Addditional gives you multi plugins all in one. It's very powerful for any theme. Plugin URI: https://redo-interactive.com Author: REDO Author URI: https://redo-interactive.com Version: 3.1 License: GPL2 */ require_once('main.php'); ?> |
We proceed to create the logic of our plug-in by editing the main.php file. In this file we will support adding a widget to our plugin WPBakery using VC_REDO.
1 2 3 | <?php class VC_REDO { } ?> |
The first step is to add the constructor to our class with the __construct() function. The constructor will accept the private $$file– this is the variable representing the file we will work on. In the constructor, we use the hooks built into the Visual Composer to “hook” our functions. Correspondingly:
- vc_before_init– we add our vc_redo_widgets(), which will be responsible for attaching the file with our widget,
- wp_ajax_vc_save_data– here we will add our update feature vc_redo_update(),
- init – when initializing we will check if WPBakery is installed using check_for_install().
1 2 3 4 5 6 7 8 9 10 11 | <?php class VC_REDO { private $file; function __construct($file) { $this->file = $file; add_action( 'vc_before_init', array($this, 'vc_redo_widgets' )); add_action( 'wp_ajax_vc_save_data', array($this, 'vc_redo_update' )); add_action( 'init', array( $this, 'check_for_install' ) ); } } ?> |
After writing the constructor function, we go to redo-init(), which will help activate our widget. In function, we’re adding the WordPress hook built into WordPress to activate the plugin – register_activation_hook(). We attach the function responsible for activating our widget – redo_activation().
1 2 3 | public function redo_init () { register_activation_hook( $this->file, array( $this, 'redo_activation' ) ); } |
The vc_redo_widgets() function that is included in our constructor contains the include containing the path to our widget, which we will write later. The path will be the widgets containing our own widget, so far we’re going to take the widget’s nameWidgetu.php.
1 2 3 | function vc_redo_widgets() { include 'widgets/nazwaWidgetu.php'; } |
Another function is vc_redo_update() – it checks if the global variable $_REQUEST, which is responsible for setting the data in this case in WPBakery. That is, if there is any change in WPBakery forms (e.g., change of checkbox) this value will be in the $_REQUEST. Going further, if this variable is set ( isset() ) – update the plugin data with update_option().
1 2 3 4 5 | function vc_redo_update() { if (isset($_REQUEST)) { update_option( 'vc_redo_update', $_REQUEST ); } } |
Another function connected to hook – redo_init – check_for_install(). It is responsible for checking that the plugins needed to display our final view are installed on our WordPress. In our case it will be the plugins:
- WPBakery,
- CPT UI,
- Custom Field.
It checks if the variables WPB_VC_VERSION, ACF_VERSION, CPT VERSION are defined. These are global plugin variables and can only be referenced if the plugin exists in our WordPress. If the variable does not exist, we display an appropriate message to install the WPBakery plugin. To display this message, include the show_redo_warning(), which displays the corresponding div.
1 2 3 4 5 6 7 8 9 10 11 12 13 14 15 16 17 18 19 20 21 22 23 24 25 26 27 28 29 30 31 32 33 34 35 36 37 38 39 40 41 42 | function check_for_install() { if (!defined('CPT_VERSION') || !defined('ACF_VERSION') || !defined('WPB_VC_VERSION')) { add_action('admin_notices', array( $this,'show_redo_warning')); return; } } function show_redo_warning() { if (!defined('WPB_VC_VERSION')) { $link = "https://wpbakery.com/"; $plugin = "WPBakery Page Builder"; ?> <div class="notice notice-warning is-dismissible"> <p>Please install <a href="<?php echo $link; ?>"><?php echo $plugin; ?></a> to use REDO JSComposer Additional.</p> </div> <?php } if (!defined('CPT_VERSION')) { $link = "https://pl.wordpress.org/plugins/custom-post-type-ui/"; $plugin = "Custom Post Type UI"; ?> <div class="notice notice-warning is-dismissible"> <p>Please install <a href="<?php echo $link; ?>"><?php echo $plugin; ?></a> to use REDO JSComposer Additional.</p> </div> <?php } if (!defined('ACF_VERSION')) { $link = "https://pl.wordpress.org/plugins/advanced-custom-fields/"; $plugin = "Advanced Custom Fields"; ?> <div class="notice notice-warning is-dismissible"> <p>Please install <a href="<?php echo $link; ?>"><?php echo $plugin; ?></a> to use REDO JSComposer Additional.</p> </div> <?php } } |
Let’s go to activating our plugin – function redo_activation(). The first step is to check with WordPress get_option() if there is an option vc_redo_update. This value will always be false when activated, because only when activated will this option be added to WPBakery plugin. Using the $vc_default_redo we set a value for our widget value: ‘on’. Then update our vc_redo_update by adding our widget.
1 2 3 4 5 6 7 | public function redo_activation () { if ( !get_option( 'vc_redo_update' ) ) { $vc_default_redo = array( 'nazwaWidgetu' => 'on' ); update_option( 'vc_redo_update', $vc_default_redo); } |
Here is our entire main.php file code
1 2 3 4 5 6 7 8 9 10 11 12 13 14 15 16 17 18 19 20 21 22 23 24 25 26 27 28 29 30 31 32 33 34 35 36 37 38 39 40 41 42 43 | <?php class VC_REDO { private $file; function __construct($file) { $this->file = $file; add_action( 'vc_before_init', array($this, 'vc_redo_widgets' )); add_action( 'wp_ajax_vc_save_data', array($this, 'vc_redo_update' )); add_action( 'redo_init', array( $this, 'check_for_install' ) ); } public function redo_init () { register_activation_hook( $this->file, array( $this, 'redo_activation' ) ); } function vc_redo_widgets() { include 'widgets/projekty.php'; } function vc_redo_update() { if (isset($_REQUEST)) { update_option( 'redo_activation', $_REQUEST ); } } function check_for_install(){ if ( ! defined( 'WPB_VC_VERSION' ) ) { add_action('admin_notices', array( $this, 'show_redo_warning' )); return; } } public function redo_activation () { if ( !get_option( 'vc_redo_update' ) ) { $vc_default_redo = array( 'projekty' => 'on' ); update_option( 'vc_redo_update', $vc_default_redo); } } function show_redo_warning(){ ?> <div class="redo-warning-container"> <p>Please install <a href="https://wpbakery.com/">WPBakery Page Builder</a> to use REDO JSComposer Additional.</p> </div> <?php } } ?> |
We need to return to the index.php file, where we need to add our VC_REDO.
We create the $redo_object, where we initiate a new instance of VC_REDO containing the __FILE__writing the filesystem path to the current file . php. We then refer to the public methods of VC_REDO that is redo_init() and redo_activation().
Our php code of the index.php file is now as follows:
1 2 3 4 5 6 7 8 9 10 11 12 13 14 15 16 17 18 19 | <?php if ( ! defined( 'ABSPATH' ) ) { die( '-1' ); } /* Plugin Name: REDO JSComposer Addditional Description: REDO JSComposer Addditional gives you multi plugins all in one. It's very powerful for any theme. Plugin URI: https://redo-interactive.com Author: REDO Author URI: https://redo-interactive.com Version: 3.1 License: GPL2 */ require_once('main.php'); $redo_object = new VC_REDO( __FILE__ ); $redo_object->redo_init(); $redo_object->redo_activation(); ?> |
We have configured a plugin to display our widget via WPBakery. We are missing only one widget. Let’s get to the heart of the article, that is adding your own widget to WPBakery.
In the widgets folder we will create a .php file with the name of our widget. In our case it will be the name of the projects.php file, which will be responsible for displaying all posts type projects, in a particular HTML view using the WPBaker.
As in the index.php file, the first step is to secure external access to the file using ABSPATH.
1 2 3 | if ( ! defined( 'ABSPATH' ) ) { die( '-1' ); } |
The next action is to create a classroom inheritance built into the WPBakeryShortCode plug-in – WPBakeryShortCode. Our class will be named by inheriting the name of the inherited class, adding the .php file name, which is: WPBakeryShortCode_projects. With extends we mark the WPBakeryShortCode class succession.
1 | class WPBakeryShortCode_projekty extends WPBakeryShortCode { } |
In our WPBakeryShortCode_projects class we have to define the content() function responsible for loading data and displaying it in the appropriate view.
1 | protected function content() { } |
Let’s go to download the projects post table. If you don’t know what it is like to create your own type of posts and how to operate on them in PHP, please refer to our article – Creating template for custom post.
The parameters are given:
- type of posture: ‘projects’,
- what posts are displayed: ‘-1′ – this will display all posts,
- display by: ‘date’ – projects will be displayed by date of creation.
We will use the WordPress WP_Query()builder method, which will send a query to the database with the parameters passed in the $args.
1 2 3 4 5 6 | $args = array( 'post_type' => 'projekty', 'posts_per_page' => -1, 'orderby' => 'date' ); $projekty = new WP_Query($args); |
We can move on to create a view that displays projects.
To display our html code correctly we need the WordPress built-in function – ob_start(), which we will add to our content() function. This function creates a buffer to which the output is written. To close this buffer, simply return to returnthe buffer cleaner function: ob_get_clean(). Between these functions we add our html code block responsible for displaying projects.
1 2 3 4 5 6 7 8 9 10 11 12 13 14 15 16 | ob_start(); ?> <div class="projekty-container"> <h2 class="projekty-container-tytul">PROJEKTY</h2> <?php while ($projekty->have_posts()) : $projekty->the_post(); ?> <div class="projekt"> <h1 class="projekt-tytul"> a href="<?php echo get_permalink(); ?>"> <?php echo get_the_title() ?> </a> </h1> <?php echo get_the_post_thumbnail(get_the_ID(), 'thumbnail'); ?> </div> <?php endwhile; ?> </div> <?php return ob_get_clean(); |
Then we proceed to the implementation of WPBakery vc_map(). Full documentation of the function can be found at there and you can find more settings options for your widget here, while this article will describe the basic settings for displaying the widget correctly.
We set the parameters of our widget accordingly:
- name: “Projects” – main name displayed in the WPBakery item list, “projects” – the servants of our name.
- base: “projects” – This is the name used later in WPBakery shortcode, i.e. by entering base name projects, our shortcode in WPBakery will look like this: [ projects ],
- category: “REDO JSComposer Additional” – the name of the category is arbitrary, in our case we called the category the name of our plugin
- description: “Display projects” – a brief description of what our widget is responsible for,
- icon: – here we add an icon that will represent our widget. Add the icon to the icons folder and then specify the path using the plugin’s built-in directory path access feature: plugin_dir_url(__FILE__) and link to the icon folder path: ‘../images/eye-icon.png‘.
1 2 3 4 5 6 7 | vc_map( array( "name" => __( 'Projekty', 'projekty' ), "base" => "projekty", "category" => __('REDO JSComposer Additional'), "description" => __('Display projects'), "icon" => plugin_dir_url( __FILE__ ).'../images/eye-icon.png' ) ); |
Całość kodu naszego pliku projekty.php wygląda następująco:
1 2 3 4 5 6 7 8 9 10 11 12 13 14 15 16 17 18 19 20 21 22 23 24 25 26 27 28 29 30 31 32 33 34 35 36 37 38 39 40 41 42 43 44 45 46 47 48 49 | <?php if ( ! defined( 'ABSPATH' ) ) { die( '-1' ); } class WPBakeryShortCode_projekty extends WPBakeryShortCode { protected function content() { $args = array( 'post_type' => 'projekty', 'posts_per_page' => -1, 'orderby' => 'date' ); $projekty = new WP_Query($args); ob_start(); ?> <!-- HTML DESIGN HERE --> <div class="projekty-container"> <h2 class="projekty-container-tytul">PROJEKTY</h2> <?php while ($projekty->have_posts()) : $projekty->the_post(); ?> <div class="projekt"> <h1 class="projekt-tytul"> <a href="<?php echo get_permalink(); ?>"> <?php echo get_the_title() ?> </a> </h1> <?php echo get_the_post_thumbnail(get_the_ID(), 'thumbnail'); ?> </div> <?php endwhile; ?> </div> <!-- HTML END DESIGN HERE --> <?php return ob_get_clean(); } } vc_map( array( "name" => __( 'Projekty', 'projekty' ), "base" => "projekty", "category" => __('REDO JSComposer Additional'), "description" => __('Display projects'), "icon" => plugin_dir_url( __FILE__ ).'../images/eye-icon.png' ) ); |
Got it! We have maintained a working plugin that will add our widgets to the WPBakery plugin.
Let’s move on to activating the plugin and adding the widget to the page.
Go to Plug-ins in WordPress panel. Find the name of our REDO JSComposer Additional plugin and activate it.

After activating the plugin, select the page to which you want to add the Projects widget. Using WPBakery Backend, add the item to the view.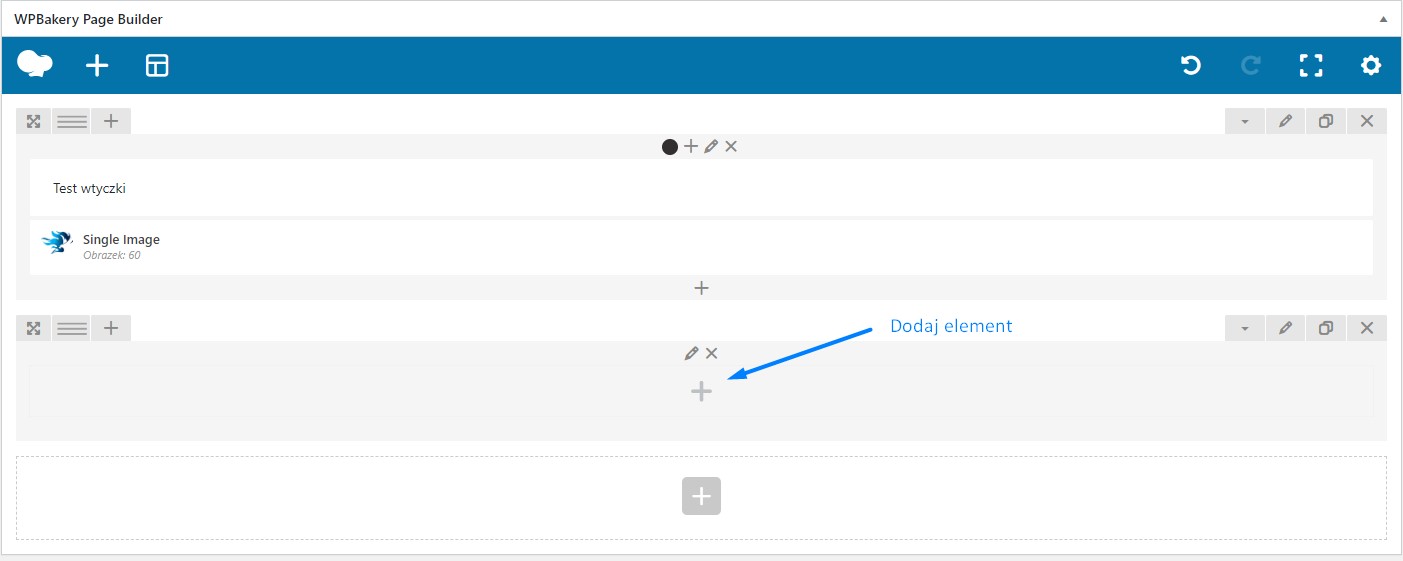
Select your widget from the list of elements and you are ready 🙂

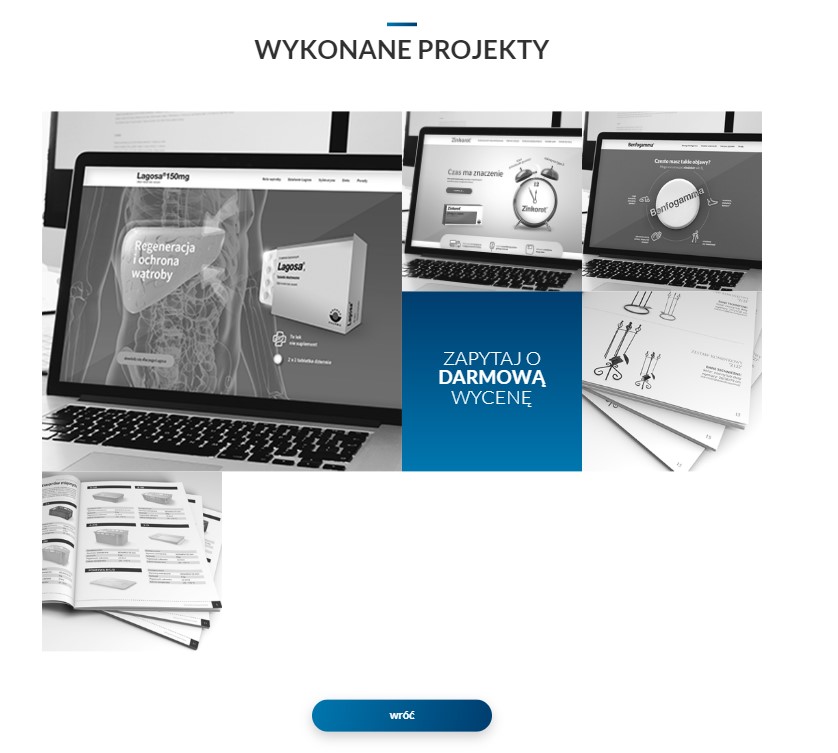
We received a view displaying projects added from WPBakery plugin.

Summmary
By adding your own widget to the WPBakery plugin, you can add Custom Post Type: projects to display anywhere on the page. This way we can add more widgets to our plugin. Just create a render analogical to projects.php from other files displaying other content. In addition, we can expand the display with specific parameters, selecting the type of posts and other features.
This is a very useful functionality, which is not present in the basic version of WPBakery plugin. It allows you to create a page using modules added with our Page Builder, which can be added in many places, and if there are any changes just edit one PHP file.