REDO JSComposer Additional – plugin adding widget to WPBakery
In this article we will create a new widget for the previously created plugin, which you will learn about from the previous article: Creating your own plugin that adds a widget to the WPBakery plugin
Let’s assume that we would like to specify a view that will display in a certain way, anywhere on the page for a particular post type and with the fields selected. Additionally, the whole thing is to be compatible with WPBakery Page Puilder plugin. For this purpose we will use the REDO JSComposer Additional plugin created in the previous entry.
How to create a plugin adding a widget to WPBakery that displays selected Custom Posts ?
Let’s get down to business.
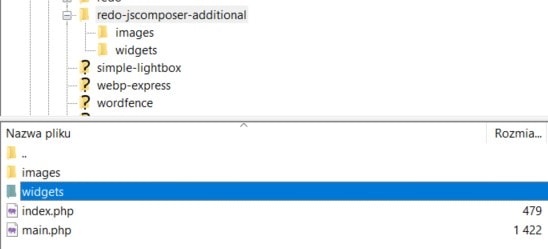
Go to the folder with our plugin – redo-jscomposer-additional – then go to the folder – widgets – and create a new .php file, which we will call custom-post-widget.php..

Now, as in the previous post, we are creating the basic framework of our widget. For this purpose we will use the previously created widget projects and copy what we need.
We leave a path to access the files ABSPATH, rename the inheriting class to WPBakeryShortCode_customPostWidget. Leave the $args table and query WP_Query and query vc_map(). Everything must be configured correctly.
Below is an empty skeleton of our widget configured to write our new plugin.
1 2 3 4 5 6 7 8 9 10 11 12 13 14 15 16 17 18 19 20 21 22 23 24 25 26 27 28 29 30 31 32 33 34 35 36 37 38 39 40 | <?php if ( ! defined( 'ABSPATH' ) ) { die( '-1' ); } class WPBakeryShortCode_customPostWidget extends WPBakeryShortCode { protected function content() { $args = array( 'post_type' => '', 'posts_per_page' => -1, 'orderby' => 'date' ); $typ_posta = new WP_Query($args); ob_start(); ?> <!-- HTML DESIGN HERE --> <?php while ($typ_posta->have_posts()) : $typ_posta->the_post(); ?> <!-- Wyświetlanie pól posta tutaj --> <?php endwhile; ?> </div> <!-- HTML END DESIGN HERE --> <?php return ob_get_clean(); } } vc_map( array( "name" => __( 'Custom Post Widget', 'custom_post_widget' ), "base" => "custom_post_widget", "category" => __('REDO JSComposer Additional'), "description" => __('Display view for Custom Post Type'), "icon" => plugin_dir_url( __FILE__ ).'../images/eye-icon.png' ) ); |
Now we can proceed to edit the widget to download the appropriate values and display them as a view.
Let’s start by preparing our widget to download a list of custom posts and fields we would like to display. We will use the WPBakery option, which allows you to download the list of posts from CPT UI plugin. The list will be passed to the $customPostList.
1 | $customPostList = get_option( 'cptui_post_types' ); |
We would like to check what’s in our variable to be able to properly filter the data and pass it to our vc_map. For this we need a function that allows debugging the variable. We will create this function in main.php, so we need to go back to the root folder of our plugin and go to edit the file.
We create the function debug(), give it the parameters public static so it can be referenced in the customPostRedo file. php. We will pass the $var– containing our “check” variable and the $die – variable responsible for the function, we will pass a value of true or false depending on whether we want the debug to work.
To correctly display variable values we have to use tag html – ‘<pre></pre>‘ and a function print_r, which will print the value of the debugged variable.
If the $die will be false, we use the die(), which will kill the debug().
1 2 3 4 5 6 | public static function debug($var, $die = false) { echo "<pre>"; print_r($var); echo "</pre>"; if ($die) die(); } |
We already know how to check what’s in our variable, let’s apply our function to it.

We received an array containing a list of custom posts that we use on our WordPress and their values set in the CPT UI plugin. In our case we would like to extract the following fields:
- post type name – it is found both as an array name [‘partners’] and as field value [name],
- fields that our post uses – basic fields such as post title, description, etc. that are under the value of the field [supports],
- custom fields – the custom fields we would like to display in the view – unfortunately they are not in the table we received.
After a proper work on an array obtained using get_option(‘cptui_post_types’) we are able to make the first two dots of the above list. To extract custom-fields, we need to create an appropriate function in main.php. Let’s move on to editing it.
Create the prepareCustomFields(), we give the status public static so we can access other files. The first step in the function is to download the groups of our fields that we have in the Custom Fields plugin. We’ll use the built-in function: acf_get_raw_field_groups(). Call it up to the $groups. The downloaded group list must be properly sorted and passed to the race board, which we will return to the customPostRedo.php file, named $$fields.
1 2 3 4 5 6 | public static function prepareCustomFields() { $groups = acf_get_raw_field_groups(); $fields = array(); return $fields; } |
Let’s create a function that will properly assign field names to the table $$fields. The function will be called parseCustomFields(), which will retrieve values:
- $fieldList– a list of custom fields that you can download using the built-in feature: acf_get_fields(), for a group of fields,
- $$fields– the output board of our function,
- $group– field group ID.
In the foreach() we assign custom fields to our table accordingly.
1 2 3 4 5 | private static function parseCustomFields($fieldList, &$fields, $group){ foreach($fieldList as $field){ $fields[$group]["fields"][$field["name"]]["value"] = $field["name"]; } } |
Now we use our function to assign custom fields to the table. Using the foreach() loop, assign appropriate fields for each group. Set the group title stored in $group[“title”] and download the list of fields using acf_get_fields(). Then we call our parseCustomFields() where we pass the parameters accordingly. Use return to return our custom fields array.
1 2 3 4 5 6 7 8 9 10 | public static function prepareCustomFields() { $groups = acf_get_raw_field_groups(); $fields = array(); foreach($groups as $group){ $fields[$group["ID"]]["title"] = $group["title"]; $field_list = acf_get_fields($group["ID"]); self::parseCustomFields($field_list, $fields, $group["ID"]); } return $fields; } |
Return to the customPostRedo.php file and proceed to modify the data before sending it to vc_map. We already have our custom post list with basic fields, which is located in the $customPostList. Let’s create two new arrays that will store the custom post type and parameters (custom post fields) accordingly:
- $_custom_posts – an array that stores the basic character fields and its type and name,
- $_custom_posts_params– an array of post type names,
We check if our list $customPostList contains some custom posts. We then assign values for each post to our $_custom_posts and $_custom_posts_params.
1 2 3 4 5 6 7 8 9 10 11 12 | if($customPostList){ foreach($customPostList as $postList){ $_custom_posts_params[$postList["label"]] = $postList["name"]; $_custom_posts[$postList["name"]]["type"] = $postList["name"]; $_custom_posts[$postList["name"]]["label"] = $postList["label"]; $supportsArray = array_flip($postList["supports"]); foreach($supportsArray as $key => $value){ $supportsArray[$key] = $key; } $_custom_posts[$postList["name"]]["supports"] = $supportsArray; } } |
- $_custom_posts_params[$postList[“label”]] = $postList[“name”] – here we assign a post type name, e.g. projects, to the $_custom_posts,
table
- $_custom_posts[$postList[“name”]][“type”] = $postList[“name”] – – Here we pass the type to the array with the post type name fields,
- $_custom_posts[$postList[“name”]][“label”] = $postList[“label”] – a post,
label
- $$supportsArray– here we reverse the board values $postList[“supports”], to make the field name the key name, then using the loop foreach() report the key value to a value to make the field name,
easier to extract later.
- $_custom_posts[$postList[“name”]][“supports”] = $supportsArray– we pass the board $supportsArray-.
The next step will be to prepare a list of custom fields for the appropriate types of entries.
We download the list of posts using the main file you created earlier. php function prepareCustomFields(), which we inherit from our class VC_REDO with the inheritance operator ‘ :: ‘.
1 | $fields = VC_REDO::prepareCustomFields(); |
We create an empty array to which we will pass the names of the custom fields accordingly. Check that the variable $fields is not empty, then using foreach(). Every field in the board $$fields are assigned to our board $customFieldsList.
1 2 3 4 5 6 | $customFieldsList = array(); if($fields){ foreach($fields as $field){ $customFieldsList[$field["title"]]["customFields"] = $field["fields"]; } } |
We move on to creating an array, which we will pass to vc_map. The array will contain previously created arrays, which will be passed to vc_map (full documentation can be found in the documentation: https://kb.wpbakery.com/docs/inner-api/vc_map/ ).
We create an array, which will be passed later as a parameter in vc_map and we will call it $paramsArray[]. We pass the first board with the names of our post types – $_custom_posts_params in value. The name of the field that will later be used to bring out the selected character type is redo_post, which we pass in param_name.
1 2 3 4 5 6 7 | $paramsArray[] = array( "type" => "checkbox", "heading" => __("Choose your Post Type"), "param_name" => "redo_post", "value" => $_custom_posts_params, "description" => __("Choose Post Type which you want to display"), ); |
Now we would like to add to our plugin the ability to select the fields to display. We will do this by passing previously created arrays to the $paramsArray[], using the foreach(). For each key $key from $_custom_posts assign a value to $cp.
The first step in the loop will be to create an array that excludes the field custom-fields from the array with basic fields (custom-fields will be passed on in a separate table), we will name it $custom_params. Using the function unset() the field is deleted custom-fields from the list. Then by means of value we pass the board $custom_params, and in param_name give a name from the post type name – $key and add the suffix _post_support.
1 2 3 4 5 6 7 8 9 10 | foreach($_custom_posts as $key => $cp){ $custom_params = $cp["supports"]; unset($custom_params["custom-fields"]); $paramsArray[] = array( "type" => "checkbox", "heading" => __("Chose additional fields for " . $cp["label"]), "param_name" => $key. "_post_support", "value" => $custom_params, "description" => __("Check fields that you need"), );} |
Now we move on to adding custom fields to our widget. We’re still in the same loop foreach(). We check if there is a field custom-fields in a given post type by checking the values $cp[“supports”][“custom-fields”]. If a value exists we create another loop foreach() to which we are passing on $customFieldList, where the key is transmitted as a variable $fk and the value as a variable $fv. In a loop we create an array $customList storing a list of custom fields, which we retrieve from $fv[“customFields”]. Then we assign key values to the values in our list $customList via the loop foreach(). The final form of the board $customList beam to the board $paramsArray[] just like the tab $custom_params.
At the bottom, the whole code making up the array $paramsArray[].
1 2 3 4 5 6 7 8 9 10 11 12 13 14 15 16 17 18 19 20 21 22 23 24 25 26 27 28 29 30 31 32 33 34 35 36 37 | $paramsArray[] = array( "type" => "checkbox", "heading" => __("Choose your Post Type"), "param_name" => "redo_post", "value" => $_custom_posts_params, "description" => __("Choose Post Type which you want to display"), ); foreach($_custom_posts as $key => $cp){ $custom_params = $cp["supports"]; unset($custom_params["custom-fields"]); $paramsArray[] = array( "type" => "checkbox", "heading" => __("Chose additional fields for " . $cp["label"]), "param_name" => $key. "_post_support", "value" => $custom_params, "description" => __("Check fields that you need"), ); if($cp["supports"]["custom-fields"]){ foreach($customFieldsList as $fk => $fv){ $customList = $fv["customFields"]; VC_REDO::debug($customList, true); foreach($customList as $ck => $cv) { $customList[$ck] = $ck; } $paramsArray[] = array( "type" => "checkbox", "heading" => __("Chose custom fields for " . $cp["label"]), "param_name" => $key. "_field_support", "value" => $customList, "description" => __("Check custom fields that you need"), ); } } } |
We pass the $$paramsArray to vc_map and we call our widget by default. If you don’t know what it’s all about I refer to the previous guide.
1 2 3 4 5 6 7 8 9 10 | vc_map( array( "name" => __( 'Custom Post Widget', 'customPostRedo' ), "base" => "customPostRedo", "category" => __('REDO JSComposer Additional'), "description" => __('Display view for Custom Post Type'), "icon" => plugin_dir_url( __FILE__ ).'../images/eye-icon.png', 'params' => $paramsArray , ) ); |
Our widget already retrieves the list of custom post types, and their fields, as well as custom fields from the Custom Fields plugin. You can now choose which types of posts you want to display and which fields.

We managed to create a widget, but we have not yet managed to display the selected parameters. We are going to edit the view displayed by our widget.
First, using extract() we retrieve the attributes passed to our widget in WPBakery. All values will be in the $atts.
1 2 3 | extract(shortcode_atts(array( '' => '', ), $atts)); |
The types of posts that are selected in the widget are under the $atts[‘redo_post’] key. First we named the parameter name for the $_custom_post_params – redo_post, so the values are under this key.
We now proceed to split the post types using the explode() function, which allows you to split the string string by the selected value. Our plugin transfers values in the form of a string string, in which the values are separated by commas. Our post types are passed to the $postTypes.
1 | $postTypes = explode(",",$atts['redo_post']); |
.
Then check if our $postTypes is not empty. If it is not, we move on to creating a view for each post type in the board. We do this using the foreach(). A single post will be under the $postType variable.
For a single character we create div named post-type-container, containing the name of the post type in the class (using CSS, we can then modify the view for each post type separately). We will display h2 informing about the post type.
1 2 3 4 5 6 7 | <?php if(!empty($postTypes)) : ?> <?php foreach($postTypes as $postType) : ?> <div class="post-type-container <?php echo $postType ?>"> <h2><?php echo $postType ?></h2> </div> <?php endforeach; ?> ?php endif; ?> |
Wewtnąrz pętli foreach() pobieramy listę postów dla danego typu poczty (zmienna $postType) i przekazujemy ją do tablicy $postList.
1 2 3 4 | $postList = get_posts(array( 'post_type' => $postType, 'posts_per_page' => -1 )); |
We then organize the $atts values and assign to the appropriate variables. The $postFields– will contain the default post if selected, while $customFields will contain custom fields. We perform extraction operations from the $atts analogically to $postTypes.
1 2 | $postFields = explode(",",$atts[$postType.'_post_support']); $customFields = explode(",",$atts[$postType.'_field_support']); ?> |
Now we check if the posts are in the $postList. If the array is not empty for each individual post we define the foreach() variable $myPost writing the entry.
For each post we create div with class post-container and post type name.
1 2 3 4 5 6 | <?php if(!empty($postList)) : ?> <?php foreach($postList as $myPost): ?> <div class="post-container <?php echo $postType ?>"> </div> <?php endforeach; ?> <?php endif; ?> |
Then, in a loop for a single post, we check that the variable $postFields is not empty and then display for each field div with class post-field-container and field name. We check if $postFields to find the value of thumbnail that stores the image. If so, we use the get_the_post_thumbnail(), if not – get_post_field(). With these functions we can display selected fields in the view.
1 2 3 4 5 6 7 8 9 10 11 12 13 | <?php if(!empty($postFields)) : ?> <?php foreach($postFields as $key => $value) : ?> <div class="post-field-container <?php echo $value ?>"> <?php if($value=="thumbnail") { echo get_the_post_thumbnail($myPost->ID, 'medium'); } else { ?> <?php echo get_post_field("post_".$value, $myPost->ID); ?> <?php } ?> </div> <?php endforeach; ?> <?php endif; ?> |
Then, in a loop for a single post, we check that the variable $postFields is not empty and then display for each field div with class post-field-container and field name. We check if $postFields to find the value of thumbnail that stores the image. If so, we use the get_the_post_thumbnail(), if not – get_post_field(). With these functions we can display selected fields in the view.
1 2 3 4 5 6 7 8 9 10 11 12 13 14 15 | <?php if(!empty($customFields)) : ?> <?php foreach($customFields as $key => $value) : ?> <div class="custom-field-container <?php echo $value ?>"> <?php $customField = get_field($value,$myPost->ID); if(is_array($customField)) { $size = 'thumbnail'; echo '<img src="' . esc_url( $customField['sizes'][$size] ) . '"/>'; } else { echo $customField; } ?> </div> <?php endforeach; ?> <?php endif; ?> |
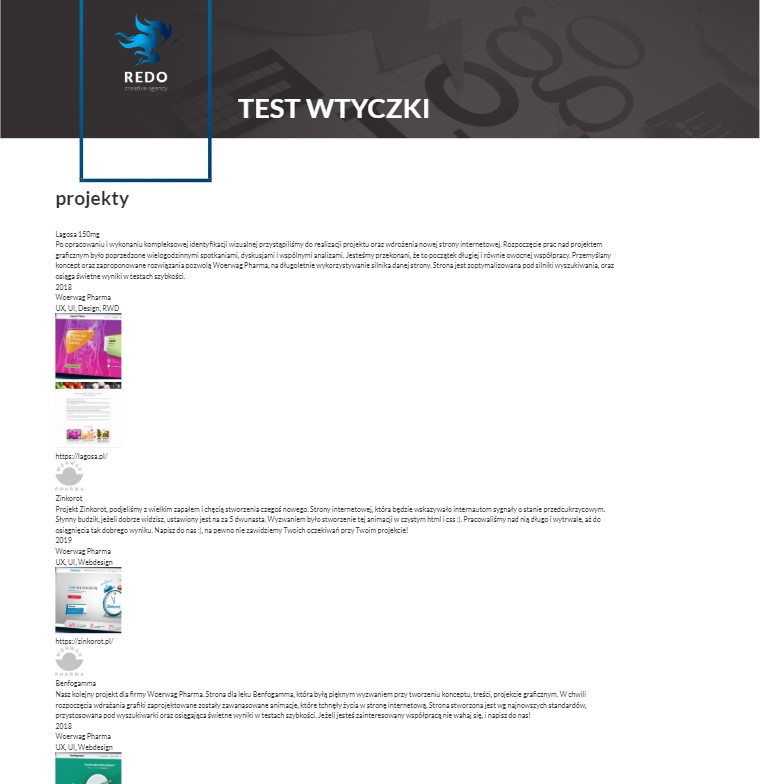
The display of selected post types and fields is ready. We have received a view that displays the fields marked in the widget
Summing
The REDO JSComposer Additional plugin allows you to create views for your own post types and fields, which you select from the WPBakery plugin. The view we have received can be easily customized using CSS, because the classes differ depending on the post type and field name.
There are many difficulties in creating a plugin. First of all, you need to familiarize yourself with association tables so you can easily operate on the data sets contained in this plugin. You also need to familiarize yourself with debugging variables. You often need to check what is in the table to understand the code above.
The plugin, which was presented in this tutorial, makes working with WPBakery and the CPT UI and Custom Fields plugins very fast.