Elementor – how to create your own custom post plugin
In this article you will learn how to add a custom post in Elementor through our plugin. In the previous guide: Creating your own plugin that adds a widget to the Elementor plugin we created a plugin that adds custom widgets to the Elementor plugin. Now we would like to create a widget for our plugin that would add posts of its own type, specified in the widget, and a field that we would also choose from Elementor. This will be the same solution as in REDO JSComposer Additional – plugin adding widget to WPBakery only instead of WPBakery the target plugin will be Elementor.
Elementor – how to create your own custom post plugin
Let’s start working on the widget.
We create another widget in the widgets folder and call it customPostRedo.php, which will store the CustomPostRedo.
 .
.
We need to return to the root folder of our plugin and edit the main.php file. We need to point the path to our widget and its class in the main E_REDO. To do this we add the same way as in the projects widget. php – path in require_once() and add a path to CustomPostRedo in register_widgets().
1 2 3 4 5 6 7 8 9 10 11 12 | private function include_widgets_files() { require_once(__DIR__ . '/widgets/projekty.php'); require_once(__DIR__ . '/widgets/customPostRedo.php'); } public function register_widgets() { $this->include_widgets_files(); \Elementor\Plugin::instance()->widgets_manager->register_widget_type(new Widgets\Projekty()); \Elementor\Plugin::instance()->widgets_manager->register_widget_type(new Widgets\CustomPostRedo()); } |
All set. We are going to edit our customPostRedo.php file. Give a proper name for namespace and add paths to the appropriate classes to use in our code. Add a check for the ABSPATH and then define the name of our class CustomPostRedo inheriting a class Widget_Base – Elementor plugin class.
1 2 3 4 5 6 7 | namespace REDO\Widgets; use Elementor\Widget_Base; use Elementor\Controls_Manager; use REDO\E_REDO; if (!defined('ABSPATH')) exit; class CustomPostRedo extends Widget_Base { } |
We’re going to create a class that supports our widget – CustomPostRedo. We define several built-in functions of Elementor, calling our widget.
1 2 3 4 5 6 7 8 9 10 11 12 | public function get_name(){ return 'customPostRedo'; } public function get_title(){ return __('Custom Post REDO'); } public function get_icon() { return 'fa fa-eye'; } public function get_categories(){ return ['general']; } |
Go to the main function _register_controls(), which will retrieve what type of custom post you want to display and what post fields you want to get in the view. To get this we need to download the list of custom posts and their fields and custom fields to the Elementor widget. We will base this on the get_option(‘cptui_post_types’) and created in the file main.php function prepareCustomFields(). Downloading a list of post types is analogous to how we created it in the article: REDO JSComposer Additional – plugin adding widget to WPBakery – this is where the functions and lists on which we will work are explained.
1 2 3 4 5 6 7 8 9 10 11 12 13 14 15 16 17 18 19 20 21 22 23 24 25 26 | protected function _register_controls() { $customPostList = get_option('cptui_post_types'); $_custom_posts = array(); $_custom_posts_params = array(); if ($customPostList) { foreach ($customPostList as $postList) { $_custom_posts_params[$postList["name"]] = $postList["label"]; $_custom_posts[$postList["name"]]["type"] = $postList["name"]; $_custom_posts[$postList["name"]]["label"] = $postList["label"]; $supportsArray = array_flip($postList["supports"]); foreach ($supportsArray as $key => $value) { $supportsArray[$key] = $key; } $_custom_posts[$postList["name"]]["supports"] = $supportsArray; } } $fields = E_REDO::prepareCustomFields(); $customFieldsList = array(); if ($fields) { foreach ($fields as $field) { $customFieldsList[$field["type"]]["customFields"] = $field["fields"]; } } } |
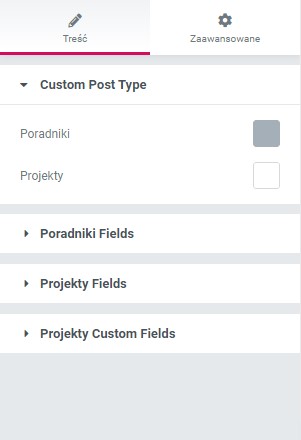
We have already prepared a list with types of posts and their fields. We create a section in our widget and give the appropriate label to indicate that it will be a section to choose the post type.
1 2 3 4 5 6 | $this->start_controls_section( 'custom-post', [ 'label' => 'Custom Post Type', 'Choose Post Type which you want to display', ] ); |
We can now display the possible types of posts to choose from. It is important to remember that each parameter name is individual and unique. If the names of any parameters are repeated – our widget will not work. It is important to name our parameter properly so that we can operate on them later on (it must be consistent to identify each parameter so that we know what it is responsible for). To display the types of posts we use the $_custom_posts_params for which we add a separate radio-button, using elementor add_control(). We define the parameter name – ‘post-type’. $key – to the array it will pass us – ‘post-type-type custom post’ – which will always be the individual name for each post type. The post type uses the type CHOOSE inherited from Controls_Manager – this type is synonymous with radio-button. In the options table, add the value $key from our list.
1 2 3 4 5 6 7 8 9 10 11 12 13 | foreach ($_custom_posts_params as $key => $value) { $this->add_control( 'post_type-'.$key, [ 'label' => $value, 'type' => \Elementor\Controls_Manager::CHOOSE, 'default' => '', 'options' => [ $key => __($key), ], ] ); } |
Now close the section for custom posts.
1 | $this->end_controls_section(); |
Subsequent sections of our widget will be created in a foreach loop for the value of the $_custom_posts storing the post type and for each post type the field types that can be displayed. Inside the loop we define a section for each post type that stores the field types. The field types will be stored in a list $custom_params for which the loop foreach where we assign the appropriate radio-buttons in the created section.
1 2 3 4 5 6 7 8 9 10 11 12 13 14 15 16 17 18 19 20 21 | $this->start_controls_section( $key .'-fields', [ 'label' => $value["label"] . ' Fields', 'Chose additional fields', ] ); $custom_params = $value["supports"]; foreach ($custom_params as $pkey => $pvalue) { $this->add_control( 'post_field-'.$key .'-' . $pvalue, [ 'label' => $pvalue, 'type' => \Elementor\Controls_Manager::CHOOSE, 'default' => '', 'options' => [ $pkey => __($pvalue), ], ] ); } $this->end_controls_section(); |
In the same loop for lists $_custom_posts, we create subsequent sections for custom fields – individually for each post type.
1 2 3 4 5 6 7 8 9 10 11 12 13 14 15 16 17 18 19 20 21 22 23 24 25 26 27 28 29 | foreach ($customFieldsList as $fkey => $fvalue) { if ($fkey == $value["type"]) { $customList = $fvalue["customFields"]; foreach ($customList as $ck => $cv) { $customList[$ck] = $ck; } $this->start_controls_section( $key . 'custom-fields', [ 'label' => $value["label"] . ' Custom Fields', 'Chose additional fields', ] ); foreach ($customList as $ckey) { $this->add_control( 'customfield-'. $key . '-' . $ckey, [ 'label' => $ckey, 'type' => \Elementor\Controls_Manager::CHOOSE, 'default' => '', 'options' => [ $ckey => __($ckey), ], ] ); } $this->end_controls_section(); } } |
The whole function code _register_controls() :
1 2 3 4 5 6 7 8 9 10 11 12 13 14 15 16 17 18 19 20 21 22 23 24 25 26 27 28 29 30 31 32 33 34 35 36 37 38 39 40 41 42 43 44 45 46 47 48 49 50 51 52 53 54 55 56 57 58 59 60 61 62 63 64 65 66 67 68 69 70 71 72 73 74 75 76 77 78 79 80 81 82 83 84 85 86 87 88 89 90 91 92 93 94 95 96 97 98 99 100 | protected function _register_controls() { $customPostList = get_option('cptui_post_types'); $_custom_posts = array(); $_custom_posts_params = array(); if ($customPostList) { foreach ($customPostList as $postList) { $_custom_posts_params[$postList["name"]] = $postList["label"]; $_custom_posts[$postList["name"]]["type"] = $postList["name"]; $_custom_posts[$postList["name"]]["label"] = $postList["label"]; $supportsArray = array_flip($postList["supports"]); foreach ($supportsArray as $key => $value) { $supportsArray[$key] = $key; } $_custom_posts[$postList["name"]]["supports"] = $supportsArray; } } $fields = E_REDO::prepareCustomFields(); $customFieldsList = array(); if ($fields) { foreach ($fields as $field) { $customFieldsList[$field["type"]]["customFields"] = $field["fields"]; } } $this->start_controls_section( 'custom-post', [ 'label' => 'Custom Post Type', 'Choose Post Type which you want to display', ] ); foreach ($_custom_posts_params as $key => $value) { $this->add_control( 'post_type-'.$key, [ 'label' => $value, 'type' => \Elementor\Controls_Manager::CHOOSE, 'default' => '', 'options' => [ $key => __($key), ], ] ); } $this->end_controls_section(); foreach ($_custom_posts as $key => $value) { $this->start_controls_section( $key .'-fields', [ 'label' => $value["label"] . ' Fields', 'Chose additional fields', ] ); $custom_params = $value["supports"]; foreach ($custom_params as $pkey => $pvalue) { $this->add_control( 'post_field-'.$key .'-' . $pvalue, [ 'label' => $pvalue, 'type' => \Elementor\Controls_Manager::CHOOSE, 'default' => '', 'options' => [ $pkey => __($pvalue), ], ] ); } $this->end_controls_section(); foreach ($customFieldsList as $fkey => $fvalue) { if ($fkey == $value["type"]) { $customList = $fvalue["customFields"]; foreach ($customList as $ck => $cv) { $customList[$ck] = $ck; } $this->start_controls_section( $key . 'custom-fields', [ 'label' => $value["label"] . ' Custom Fields', 'Chose additional fields', ] ); foreach ($customList as $ckey) { $this->add_control( 'customfield-'. $key . '-' . $ckey, [ 'label' => $ckey, 'type' => \Elementor\Controls_Manager::CHOOSE, 'default' => '', 'options' => [ $ckey => __($ckey), ], ] ); } $this->end_controls_section(); } } } } |
We have received a view in the elementary containing all the sections that store the relevant values:
Now we would like the values selected in the widget to be displayed in the view. The display will be very similar to widget for WPBakery. The difference will be that it’s not in the $atts array as in WPBakery, but in the $settings array, which is completed by the get_settings_for_display() function, which returns the widget parameters and their values. The view will be passed on in the render() function.
1 2 3 | protected function render() { $settings = $this->get_settings_for_display(); } |
We download a list of post types selected in the widget. Create an empty $postTypes to which we will forward the post types. Using the foreach loop we search the $settings. If the array key contains ‘post_type-‘ and the value for the key is not empty, we pass the value to $postTypes.
1 2 3 4 5 6 7 | foreach($settings as $key => $value) { if (strpos($key, 'post_type-') !== false) { if(!empty($value)) { $postTypes[$value] = $value; } } } |
We’ve already downloaded the list of post types downloaded from the widget. Now we move on to displaying a view for them. The first step is to check if the $postTypes contains the post types. If it is not empty for each post type, an array displays the container and name of the post type.
1 2 3 4 5 6 | <?php if (!empty($postTypes)) : ?> <?php foreach ($postTypes as $postType) : ?> <div class="post-type-container <?php echo $postType ?>"> <h2><?php echo $postType ?></h2> </div> <?php endforeach; endif; ?> |
For each type of posting we download a list of posts. In the $args table, we specify for which post type we want to download the list and the number of posts. In the $query we make a WP_Query on the board $args. The posting list contained in $query is forwarded to the $postList table, which will store the downloaded posts.
1 2 3 4 5 6 7 | $args = array( 'post_type' => $postType, 'posts_per_page' => -1, 'orderby' => 'date' ); $query = new \WP_Query($args); $postList = ($query->posts); |
Now we’re checking that the $postList is not empty. If not, we will display a container for each character and its title.
1 2 3 4 5 | if (!empty($postList)) : ?> <?php foreach ($postList as $myPost) : ?> <div class="post-container <?php echo $postType ?>"> <h2><?php echo $myPost->post_title; ?></h2> </div><?php endforeach; endif; |
Now search the $settings table and display the selected fields. As with the post types using strpos() we check if the key contains ‘post-field‘ or ‘customfield‘ and display these fields accordingly. The display is similar to WPBakery – I refer to this article – link if you do not understand the code below.
1 2 3 4 5 6 7 8 9 10 11 12 13 14 15 16 17 18 19 20 21 22 23 24 25 | foreach($settings as $key => $value) { if (strpos($key, 'post_field-'.$postType) !== false) { if(!empty($value)) { ?> <div class="'post-field '<?php echo $postType . ' ' . $value ?>"> <?php if($value=="thumbnail") { echo get_the_post_thumbnail($myPost->ID, 'medium'); } else { echo get_post_field("post_".$value, $myPost->ID); }?> </div> <?php } } if (strpos($key, 'customfield-'.$postType) !== false) { ?> <div class="'post-field '<?php echo $postType . ' ' . $value ?>"> <?php $customField = get_field($value,$myPost->ID); if(is_array($customField)) { $size = 'thumbnail'; echo '<img src="' . esc_url( $customField['sizes'][$size] ) . '"/>'; } else { echo $customField; } ?> </div> <?php } |
The whole file code customPostRedo.php:
1 2 3 4 5 6 7 8 9 10 11 12 13 14 15 16 17 18 19 20 21 22 23 24 25 26 27 28 29 30 31 32 33 34 35 36 37 38 39 40 41 42 43 44 45 46 47 48 49 50 51 52 53 54 55 56 57 58 59 60 61 62 63 64 65 66 67 68 69 70 71 72 73 74 75 76 77 78 79 80 81 82 83 84 85 86 87 88 89 90 91 92 93 94 95 96 97 98 99 100 101 102 103 104 105 106 107 108 109 110 111 112 113 114 115 116 117 118 119 120 121 122 123 124 125 126 127 128 129 130 131 132 133 134 135 136 137 138 139 140 141 142 143 144 145 146 147 148 149 150 151 152 153 154 155 156 157 158 159 160 161 162 163 164 165 166 167 168 169 170 171 172 173 174 175 176 177 178 179 180 181 182 183 184 185 186 187 188 189 190 191 192 193 | <?php namespace REDO\Widgets; use Elementor\Widget_Base; use Elementor\Controls_Manager; use REDO\E_REDO; if (!defined('ABSPATH')) exit; class CustomPostRedo extends Widget_Base { public function get_name() { return 'customPostRedo'; } public function get_title() { return __('Custom Post REDO'); } public function get_icon() { return 'fa fa-eye'; } public function get_categories() { return ['general']; } protected function _register_controls() { $customPostList = get_option('cptui_post_types'); $_custom_posts = array(); $_custom_posts_params = array(); if ($customPostList) { foreach ($customPostList as $postList) { $_custom_posts_params[$postList["name"]] = $postList["label"]; $_custom_posts[$postList["name"]]["type"] = $postList["name"]; $_custom_posts[$postList["name"]]["label"] = $postList["label"]; $supportsArray = array_flip($postList["supports"]); foreach ($supportsArray as $key => $value) { $supportsArray[$key] = $key; } $_custom_posts[$postList["name"]]["supports"] = $supportsArray; } } $fields = E_REDO::prepareCustomFields(); $customFieldsList = array(); if ($fields) { foreach ($fields as $field) { $customFieldsList[$field["type"]]["customFields"] = $field["fields"]; } } $this->start_controls_section( 'custom-post', [ 'label' => 'Custom Post Type', 'Choose Post Type which you want to display', ] ); foreach ($_custom_posts_params as $key => $value) { $this->add_control( 'post_type-'.$key, [ 'label' => $value, 'type' => \Elementor\Controls_Manager::CHOOSE, 'default' => '', 'options' => [ $key => __($key), ], ] ); } $this->end_controls_section(); foreach ($_custom_posts as $key => $value) { $this->start_controls_section( $key .'-fields', [ 'label' => $value["label"] . ' Fields', 'Chose additional fields', ] ); $custom_params = $value["supports"]; foreach ($custom_params as $pkey => $pvalue) { $this->add_control( 'post_field-'.$key .'-' . $pvalue, [ 'label' => $pvalue, 'type' => \Elementor\Controls_Manager::CHOOSE, 'default' => '', 'options' => [ $pkey => __($pvalue), ], ] ); } $this->end_controls_section(); foreach ($customFieldsList as $fkey => $fvalue) { if ($fkey == $value["type"]) { $customList = $fvalue["customFields"]; foreach ($customList as $ck => $cv) { $customList[$ck] = $ck; } $this->start_controls_section( $key . 'custom-fields', [ 'label' => $value["label"] . ' Custom Fields', 'Chose additional fields', ] ); foreach ($customList as $ckey) { $this->add_control( 'customfield-'. $key . '-' . $ckey, [ 'label' => $ckey, 'type' => \Elementor\Controls_Manager::CHOOSE, 'default' => '', 'options' => [ $ckey => __($ckey), ], ] ); } $this->end_controls_section(); } } } } protected function render() { $settings = $this->get_settings_for_display(); $postTypes = array(); foreach($settings as $key => $value) { if (strpos($key, 'post_type-') !== false) { if(!empty($value)) { $postTypes[$value] = $value; } } } ?> <!-- HTML DESIGN HERE --> <?php if (!empty($postTypes)) : ?> <?php foreach ($postTypes as $postType) : ?> <div class="post-type-container <?php echo $postType ?>"> <h2><?php echo $postType ?></h2> <?php $args = array( 'post_type' => $postType, 'posts_per_page' => -1, 'orderby' => 'date' ); $query = new \WP_Query($args); $postList = ($query->posts); if (!empty($postList)) : ?> <?php foreach ($postList as $myPost) : ?> <div class="post-container <?php echo $postType ?>"> <h2><?php echo $myPost->post_title; ?></h2> <?php foreach($settings as $key => $value) { if (strpos($key, 'post_field-'.$postType) !== false) { if(!empty($value)) { ?> <div class="'post-field '<?php echo $postType . ' ' . $value ?>"> <?php if($value=="thumbnail") { echo get_the_post_thumbnail($myPost->ID, 'medium'); } else { echo get_post_field("post_".$value, $myPost->ID); }?> </div> <?php } } if (strpos($key, 'customfield-'.$postType) !== false) { ?> <div class="'post-field '<?php echo $postType . ' ' . $value ?>"> <?php $customField = get_field($value,$myPost->ID); if(is_array($customField)) { $size = 'thumbnail'; echo '<img src="' . esc_url( $customField['sizes'][$size] ) . '"/>'; } else { echo $customField; } ?> </div> <?php } } ?> </div> <?php endforeach; ?> <?php endif; ?> </div> <?php endforeach; ?> <?php endif; ?> <!-- HTML END DESIGN HERE --> <?php } } |
Summary
We have received a view that displays the posts of the selected custom post type and their fields, which we also select in the widget. This view can be easily converted using CSS, because each div of a field is individually named with the post type name and field type name.
It is important to remember when creating similar widgets for Elementor, that parameter names must have unique names – if any parameter name is repeated, the widget will not work properly. It is also worth using variable debugging to check the contents of our lists on which we operate.